Re-usable Mat Board with Protective Polyethylene Cover

To fill my need for an easy and economical alternative to standard window mats for showing prints at club competitions I’ve developed a simple system, as implied in the title above. Although certainly not suitable for special competitions or exhibits outside our camera club, in my opinion it is perfectly satisfactory for club use, where the main requirements are a suitable board to hold the print on our light box during viewing and critique, and a means to protect the print during transport and when it is laid flat (w/ other prints) before and after judging.

Laurie Naiman
Webmaster

ADDENDUM 8-8-12 (additional suggestions from Asst Print Chair Charlene Yoshizu)

Thanks to Laurie for providing excellent guidelines on preparing prints for
PACC competitions. I agree with everything he said. Based on my recent
experience as assistant to the print chair, I would like to expand on what
he already proposed.

Keep in mind that we are moving dozens of prints and the suggestions below
are intended to minimize disruptions, “print malfunctions” and damage to
your prints. This especially applies during the judging period when we are
quickly moving prints around.

1) When using clear plastic to protect your prints, be sure it does not
extend beyond any of the four edges of the mounting board. This also applies
to when the plastic is flipped behind the print.  Otherwise, the print will
be more difficult to handle and/or not lay flat on the light box and in the
category bins. When using clear bags for the cover, cut the bag open so that
you use only one layer.

2) Be sure the label is visible when the protective cover is flipped behind
the print. This is only a problem if you use an opaque cover, such as
cardboard.  It’s not a problem if you use clear plastic, the preferred
material.

3) When reusing a cover or mat board and switching from horizontal to
vertical orientation, or vice versa, be sure to reattach the plastic cover
to the *top* of the matboard, not the *side*. Also, the label should be
moved to the top left corner on the back of the print.

4) If an over-mat board is hinged to an under-mat board, be sure to secure
together the sides opposite the hinge to prevent the mat boards from
swinging open like a book. When the entire print and mounting is secure,
it’s easier to handle and reduces the chance of damaging your print. Note:
Use a removable tape such as the “Artist Tape” from Aaron Brothers. It’s
strong and a little bit goes a long way.

5) If you must hand-print your ID labels, please print neatly. Also use dark
ink (e.g. fine-point Sharpie) so that we can read your writing under low
light. Of course it’s best to print your labels soon after you’ve submitted
your entries online so that you don’t have to remember the title and
category, and the information is legible.

———————————————————————————————

The following materials are needed for each board: (Since most of my prints are around 11×14 inches, I stick to 16×20 inch board and cover sheet. The system can be adapted for any size print. Most of these materials can be obtained at a good photo or art supply store.)

  • a 4-ply ‘bright white’ mat board (need not be archival)
  • a sheet of clear polyethylene plastic the same size as the above board (an easy source is one of the 16×20 in. clear polyethylene plastic envelopes sold for protecting matted prints. The slightly larger heavyweight envelope without an adhesive seal allows easy insertion and removal of the mat board after transport.). Cutting this in half along the long side yields 2 sheets
  • plastic tape about 2 inches wide (such as Scotch brand used for sealing parcels) to affix the plastic sheet to the back of the mat board
  • Removable double-sided Scotch Brand Poster tape (3/4 inch wide) to affix the print to the front of the mat board (ADDENDUM 10-16-13: I now use Scotch 3M Removable Clear Mounting Squares, ‘Small’ [.687 in x.687 in.], available at Office Depot and possibly other stores.)
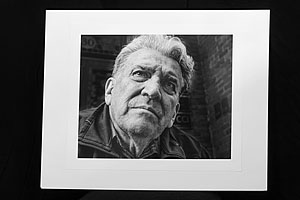
Print on mat board (leaning against a black wall), with plastic cover folded over the back and not visible. The print is affixed to the board with one-inch pieces of the removable poster tape (above). (This tape is a bit tricky to separate from its covering.)

If the white border around the image is excessive or uneven, it may be removed w/ a good paper cutter.
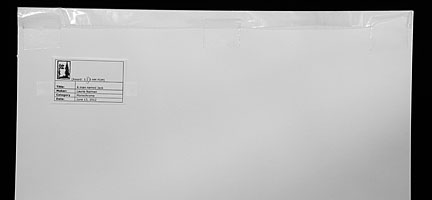
The plastic sheet is taped across the rear top edge of the board, with the edge of the plastic positioned about 1 inch below the top of the board. (Note the pre-printed club label is in the top left corner of the back side of the mat board.)
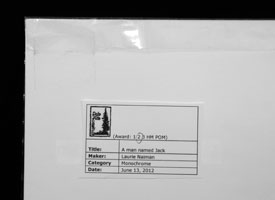
Close-up of the top left corner of the back side of the mat board.


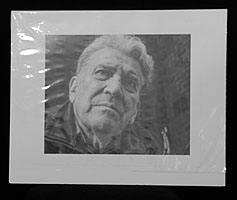
This is what the covered mat board looks like. Ugly, but it does the job, and only you, the print chair (& others who are curious) will see it.

Before the print is placed under the light box by the print competition chair for viewing and critique, the plastic cover is flipped over the top edge to the back. Care needs to be taken to make sure the plastic cover remains flat between the board and the light box surface.

To facilitate easy removal of the adhesive strips holding the print to the mat board, it’s best to remove the print and discard the adhesive within a few days of the competition. The mat board can then be stored for re-use.

One Response to Re-usable Mat Board with Protective Polyethylene Cover

  1. Pingback: WHY SHOULD PHOTOGRAPHERS SHOW THEIR WORK AS PRINTS? | Palo Alto Camera Club

Comments are closed.